Tuesday, August 9, 2011

Picnic at the Montage

Picnic at the Montage


On Sunday a couple friends of mine and I went to the Montage in Laguna Beach for a picnic, and a few games of Bocce Ball.  It turned out to be a very nice day.  As I love to cook, I took charge of the picnic part and made chicken salad sandwiches, and a lemon-berry trifle for dessert.


To make it easy, I bought a rotisserie chicken for the chicken salad.  Doing that cut down on the prep time for the chicken salad sandwiches quite a bit.  Here are the recipes for a perfect picnic!

Arugula Pesto Chicken Salad Sandwiches


This is a delicious chicken salad sandwich with roasted red peppers, havarti cheese, and lettuce.  It's easy to make, and has a great presentation.  Using two chicken breasts yielded 3 very large sandwiches, and could easily yield 4 still good-sized sandwiches.


Ingredients

1 Rotisserie Chicken (you just need the breasts)      
1 Roasted Red Pepper (per sandwich)
1 Slice Havarti Cheese (per sandwich)
Lettuce
Ciabatta Baguette 
2 cups Baby Arugula
2 cloves of Garlic
4 tbsp Olive Oil
4-6 tbsp Veganaise (to taste)
1/2 cup grated Pecorino Romano Cheese
Zest of 1/2 Lemon
Salt
Pepper

We will start with the arugula pesto.  Combine the arugula, garlic, olive oil, salt, pepper, and pecorino romano cheese in the food processor until smooth.  Set aside until we are ready to combine with the chicken.


Cut the breasts off the chicken.  Leave the skin on, as the skin adds a nice flavor to the mix.  Dice up the chicken into small 1/4 to 1/2 inch cubes.  Combine the chicken, veganaise, and pesto mixture.  I used about half the pesto mixture (approx. 5 tbsp), and saved the rest.  Zest the rind of 1/2 of a lemon, and mix into the chicken salad.

I took one ciabatta baguette and cut it into thirds, then cut each third in half to make the sandwich.  Place 1/3 of the chicken salad in each sandwich, top with roasted red pepper, havarti cheese, and lettuce.  I cut up tomatoes, but thought it would be a little much to have tomato and roasted red pepper.  I brought the tomato along so each person could make that decision for themselves.

These sandwiches are simple, and delicious.  I like to use veganaise when making chicken salad, or tuna sandwiches as it is olive oil based and while it still has packs quite a few calories, it has significantly less cholesterol than regular mayonnaise.
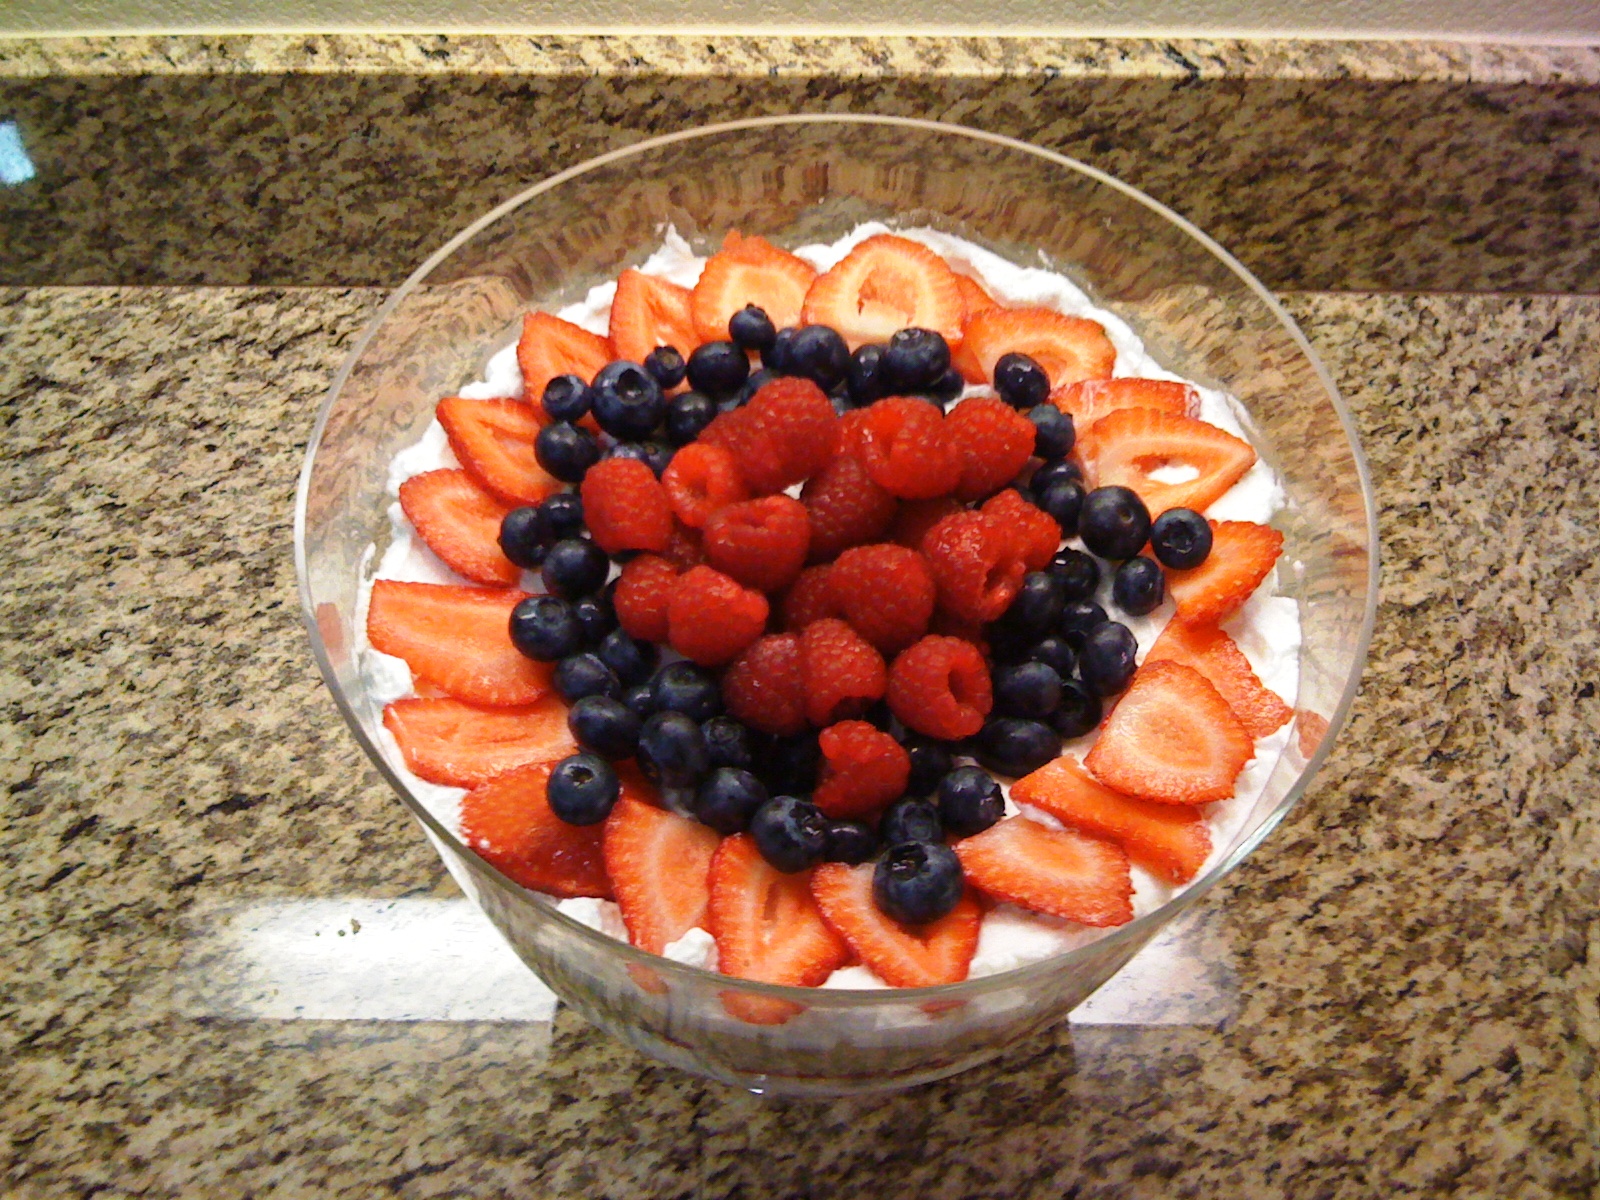
Lemon-Berry Trifle

This is a light dessert, great for a hot summer day, and also has a great presentation.  Again, I cut corners on this recipe.  I bought an organic box of lemon cake mix from Whole Foods.  I am not a huge dessert fan, so it is rare that I put a lot of effort into making one.  Which is great, because this one is pretty simple!


Ingredients


2 cups Whipping Cream
1 small box Blueberries
1 small box Raspberries
1 large box Strawberries
4 tbsp Sugar
1 Lemon Cake Mix
Eggs/milk/oil for Cake Mix (quantities vary depending on mix)

Start by making the lemon cake according to the directions on the box.  While it is cooking, whip the whipping cream, adding the sugar to taste.  Once the cake is fully baked, remove it from the oven and let it cool completely.  I cut off all the edges, top, and bottom, to avoid using the darker brown edges of the cake.  Put the cake in a food processor and pulse until the cake is all crumbs.  Rinse all your berries, and cut the strawberries into slivers.

The first layer of your trifle is cake.  Spread half of the cake mixture evenly in the bottom of your trifle bowl.  Top that with an evenly spread layer of the whipped cream (1/2 of the whipped cream).  Arrange the berries in an attractive fashion around the outside of the bowl, and sprinkle the rest with a mixture of the berries.  Repeat the layers, and top with layers of berries!


Take these items to a park, setup a nice picnic and enjoy!  We went to the Montage, and setup in the grass at a park overlooking the ocean in Laguna Beach.  It was beautiful.  We enjoyed lunch, wine spritzers, dessert, and an insane number of bocce ball games!  It got competitive.  I'm still pissed that I didn't win.


Rigatoni with Squash Pasta Sauce and Shrimp

Rigatoni with Squash Pasta Sauce and Shrimp


This recipe was inspired by a squash pasta dish created by Giada De Laurentiis, but I changed quite a bit because I thought her version was rather bland.  Actually, I changed pretty much everything.  The only similarity is that it has both squash and shrimp, even the way it is prepared is different.  This is a great summer dish, easy to make, and a great way to get in an extra vegetable without realizing it!

My dad makes a delicious squash puree as one of our Thanksgiving side dishes.  He roasts butternut squash which I think brings out a great full nutty flavor.  I decided to roast my squash to bring out this full flavor.  I picked up the shrimp from the seafood counter in whole foods, and was surprised that it was pretty reasonably priced, and definitely tasted fresh.

As always, I seem to be unable to cook small portions of anything.  I ended up using the whole box of rigatoni.  Needless to say, I had a lot of leftovers (which made for great lunches!).  If you are cooking for 1 or 2, I recommend that you half the recipe.


Ingredients

1 Package Rigatoni Noodles                                                
1/2 lb Peeled and Deveined Shrimp 
1 large Butternut Squash (4 cups cubed)
1/4 Cup Pine Nuts
1/2 Cup Vegetable Stock
1/2 Cup Whole Milk
4-6 tbsp Olive Oil
1 White Onion
2 Slices of Prosciutto
4 Cloves of Garlic
Fresh Basil (4-5 larger leaves)
Salt
Pepper

Preheat the oven to 400 degrees.  Cut the Butternut Squash into 1-1.5 inch cubes.  Try to keep the size of the cubes uniform so they all cook in the same amount of time.  Cut half the onion into 1-inch chunks, and peel 3 garlic cloves (these do not need to be minced).  Combine these three ingredients into a roasting pan, and toss with 3-4 tablespoons of olive oil until all pieces are covered.  Season with a little salt and pepper.  Bake in the preheated 400 degree oven for 20-25 minutes or until you can easily smash the cubes with a fork.


Once the butternut squash is done roasting, transfer to a food processor, make sure to pour in the olive oil left over in the pan as it holds a lot of flavor from being roasted with the garlic and onion.  Pour in 1/2 cup each of chicken stock, and whole milk.  Food process the mixture until it is a smooth sauce.  Season with additional salt and pepper to taste.

Keep the oven on!  At this point, place the 2 slices of prosciutto on a piece of tin foil.  Crisp them in the oven.  With the oven at 400 degrees, this should only take about 5 minutes.  Now is the perfect time to roast your pine nuts.  I simply throw them on a skillet and keep them moving on the heated skillet until they turn golden brown.

Meanwhile, saute the shrimp with the remaining olive oil, a minced clove of garlic, salt and pepper.  I used medium sized shrimp, and I cooked them for about 2-3 minutes on each side.  You don't want to overcook them as they will turn rubbery.  

Rigatoni are a little thicker than the average noodle, so they need to be cooked longer, usually 10-12 minutes.  I like mine al dente, so I boiled mine for 10.  Once you have drained the noodles, combine them with the pasta, and chiffonaded basil (keep a little basil separate to sprinkle on top).  Top this mixture with the shrimp, crisped prosciutto, roasted pine nuts, and the remaining basil.  The crisped prosciutto adds a nice salty flavor to the dish, while the pine nuts compliment the nutty flavor of the roasted squash.


Enjoy!


Wednesday, August 3, 2011

Caprese-Prosciutto Cups

Caprese-Prosciutto Cups with Balsamic Syrup

This is a very simple recipe that is quick to make, delicious, and has a great presentation.  It is my take on a caprese salad.  I frequently serve it as an appetizer when I make Italian food.  It is always a favorite, and with only five ingredients, it could not be easier to make.

You will need a mini muffin pan, which is not the most common thing to have in the kitchen, but comes in handy more often than you would think.  I bought one because I love making appetizers, and you can pretty much make any large recipe into small bite sized hors d'oeuvres.  Another recipe that is easy to convert to an appetizer is my quiche recipe (to come).


Ingredients


Prosciutto (amount depends on quantity desired)
Cherry or Grape Tomatoes
Fresh Mozzarella
Fresh Basil
Balsamic Syrup (see recipe)


Preheat the oven to 400 degrees.  Cut the prosciutto in half width wise.  Line the muffin tin with the prosciutto making it in to small cups.  It should look something like this:


Put the prosciutto cups in the oven for 10-12 minutes or until they are crispy, but not burnt.  This is a fine line as the prosciutto is very thin, and can burn easily.  

While the cups are baking in the oven, start working on the filling.  I try to buy the small fresh mozzarella balls from Trader Joe's because when you cut them in half they are the perfect size.  Unfortunately, Trader Joe's was out of that size, so I had to settle for regular fresh mozzarella.  If you can find the small mozzarella balls, cut them in half, if not, cut the mozzarella into small 1/2 inch squares.  Slice the cherry tomatoes in half, and cut the basil into small strips.  

Once the prosciutto is crisped into small cups, take it out of the oven, and you are ready to assemble the caprese-prosciutto cups.  Take a piece of the cheese, a strip of the basil, and half a cherry or grape tomato, sandwich them together, and place inside the bowl.  Could not be easier!  All you need to do now is drizzle the balsamic syrup over each cup, and serve!

This does not need to be served hot, you can make the prosciutto bowls the night before, and refrigerate them.  I do recommend stuffing them right before you serve them, but you can make the bowls a day early.

The balsamic syrup is really easy.  Bring a cup of balsamic vinegar to a boil in a small sauce pan.  Add 3-4 tablespoons of sugar, and let reduce (simmer) for about 10 minutes.  I make this in advance, and usually have it available in the fridge.  Make sure to let it cool before topping the caprese-prosciutto cups.


Wednesday, July 20, 2011

Tofu Coconut Curry

Tofu Coconut Curry

For my first post, I decided to make Tofu Coconut Curry.  I recently went to the vegan restaurant Au Loc in Huntington Beach, and was reminded how much I enjoy eating vegetarian/vegan dishes.  

I looked up a few recipes, and read the comments that were posted by people who had made the dish.  I took the suggestions posted by people who had tried the recipes, and compiled the recipes and suggestions into my own version of the dish.

Of course as I was making it, I adjusted the recipe I compiled as I saw fit, and will do my best to stay true to how I made it, because it was REALLY good!

Even though I added twice the recommended amount of curry paste as was suggested in the recipes, I still thought the recipe turned out a little bland, so I topped mine off with some Sriracha, a chili paste I recently learned about from my friends vegan food blog.  Coincidentally this recipe is vegan too!  Here goes, I hope you try it out and enjoy it as much as I did!


Ingredients

2.5  cups unsweetened Coconut Milk
1     Extra Firm Tofu
2     Tbsp Extra Virgin Olive Oil
1/2  lb Bok Choy
1     small head of Broccoli 
1     White Onion
1     Carrot
1     Red Pepper
2     Tbsp Curry Paste
2     Tbsp brown sugar
Green Onions
Cilantro 
Sriracha (to taste)
Rice/Quinoa/Barley

Cut the tofu length wise into 1/2 to 3/4 inch slices.  Tear up the slices into rough parts.  Heat a skillet with the olive oil, and brown the tofu on all sides.  Roughly cut the head of broccoli, bok choy, onion, red pepper, carrot, and green onion.

Meanwhile, mix the coconut milk, finely sliced cilantro, and brown sugar.  Once the tofu is browned, add the coconut milk mixture, and all vegetables.  Simmer over low heat until vegetables are at their desired tenderness.  

Top whichever grain you decide to make with the sauce, and serve!  As I said before, I wanted a little more of a kick to mine, so I topped it with some sriracha, try it out!